
Framed Nameplate
⚠️ Usage & Installation Precautions
【Important】Two Installation Options and Wall Compatibility
This product offers two installation methods depending on your wall conditions.
Please confirm which method suits your installation site before beginning work.
【Option A】Screws + Adhesive
For walls where drilling is possible, such as wooden gateposts or concrete walls.
・The included screws (M4 × L40) are designed for wooden gateposts.
For concrete or masonry block walls, use them in conjunction with concrete anchors (plugs) sourced separately on site.
・For other wall surfaces or substrates, please prepare appropriate mounting hardware suitable for the wall material
or consult a professional contractor.
・If you have any concerns regarding installation, we recommend hiring a professional contractor.
【Option B】Double-Sided Tape + Adhesive
For surfaces where drilling is not possible.
【Surfaces where tape and adhesive cannot bond】
・Textured, rough, or curved wall surfaces
・Easily damageable surfaces (such as wallpaper) or surfaces with peeling paint
・Hard-to-bond materials, including PVC (polyvinyl chloride), rubber, polypropylene, and polyethylene
・Surfaces with fluorine or silicone coatings
・Concrete or plaster/stucco walls
Precautions for Applying Double-Sided Adhesive Tape
・Apply Firm Pressure: Apply firm, even pressure across the surface after placement (pressure-sensitive adhesive).
・24-Hour Curing Period: It takes approximately 24 hours for the tape to achieve its maximum bonding strength.
・Non-Repositionable: Do not attempt to reposition once applied.
Once peeled off, the tape will lose its intended adhesive performance and cannot be reused.
・Low-Temperature Installation Caution: In cold environments, the adhesive tape may not achieve its optimal bonding strength.
When installing, gently warm the tape with a hair dryer before application.
■ Package Contents
▼ Set 1:Common Parts (Frame Package)
・Framed Sign Outer Frame × 1 (Ordered size)
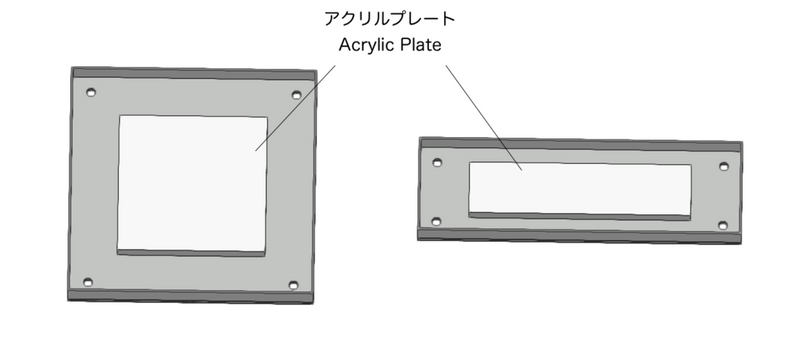
・Height-Adjustment Acrylic Plate (with double-sided tape) × 1 *Used only for metal plates
・Wall-Mount Screws (M4 × L40 Countersunk Screws) × 4
▼ Set 2:Plate Package
【Metal Plate】:
・Sign Plate × 1 (Ordered size)
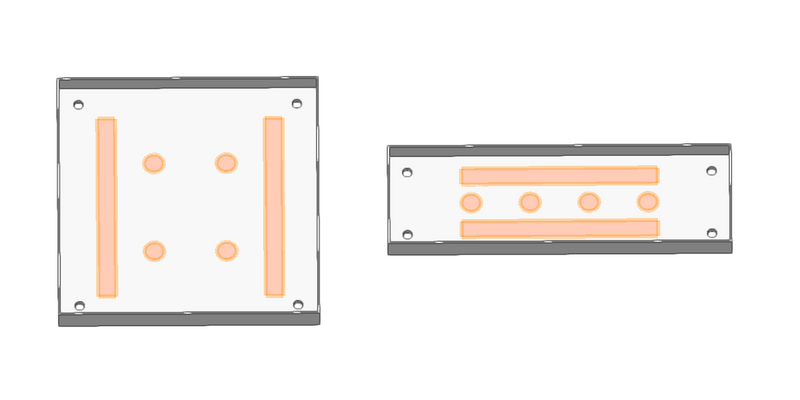
・Double-Sided Adhesive Tape (Red) × 2 strips
・Adhesive × 1 tube
【Wood / Stone Plate】:
・Sign Plate × 1 (Ordered size)
・Double-Sided Adhesive Tape (Red) × 4 strips
・Adhesive × 1 tube
■ Assembly & Installation Instructions
STEP 1: Mount the Outer Frame to the Wall (Choose Option A or B)
【Option A】Securing with Screws + Adhesive
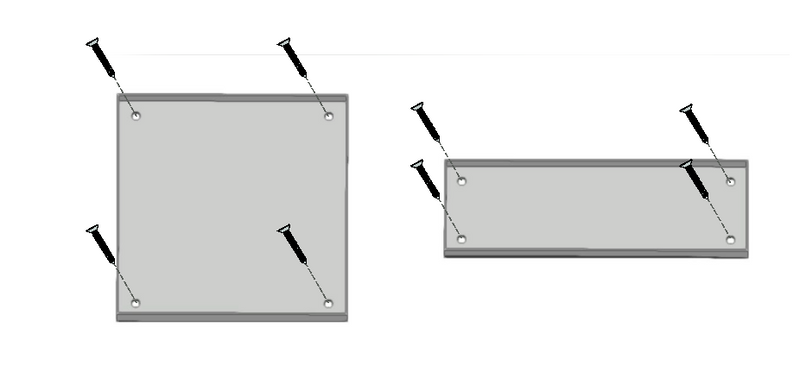
- Hold the frame against the wall, check that it is level, mark the four corner hole positions,
and drill pilot holes (insert concrete anchors if mounting to concrete or masonry). - Apply half of the adhesive to the back surface of the frame.
- Fasten the frame securely to the wall using the four included countersunk screws.

【Option B】Securing with Double-Sided Tape + Adhesive
- Wipe away any dust, dirt, or oil from both the wall and the back surface of the frame.
- Apply the double-sided tape strips (red) to the back of the frame.
- Apply half of the adhesive in dots across at least 4 locations, applying them slightly thicker than the double-sided tape so they rise above it.
- Peel off the release paper, align the frame with the wall, and press firmly for approximately 30 seconds to bond.
*The adhesive takes approximately 24 hours to fully cure; temporarily secure the frame in place with masking tape during this period.
*To prevent damage to the finish or print, ensure tape does not overlap with any text or logos. - Once fully cured, gently remove the temporary masking tape.

STEP 2: Mount the Plate into the Frame (By Material)
【For Metal Plates】(Uses the Acrylic Plate from Common Parts)
- Peel off the release paper from the back of the "Height-Adjustment Acrylic Plate" (from Common Parts),
place it in the center inside the frame, and press firmly to bond. - Peel off the release paper from the front surface of the acrylic plate,
align the metal plate within the frame, and press firmly into place to secure it.
【For Wood / Stone Plates】(Uses 2 Strips of Double-Sided Tape + Half the Adhesive)
*The acrylic plate from Common Parts is not used.
- Apply 2 strips of double-sided tape (red) onto the inner bottom surface of the frame, and peel off the release paper.
- Apply the remaining half of the adhesive in dots across at least 4 locations,
applying them slightly thicker than the double-sided tape so they rise above it. - Align the plate within the frame and press it firmly for approximately 30 seconds to bond.
*The adhesive takes approximately 24 hours to fully cure; temporarily secure the plate with masking tape during this period.
*To prevent printed graphics from peeling off, avoid applying tape over any text or logos. - Once fully cured, gently remove the temporary masking tape.