

OPEN & CLOSED WALL SIGN

⚠️ Usage & Installation Precautions
- Once fully cured, removing the sign from the wall surface becomes extremely difficult.
Please confirm and finalize your installation location before beginning the work.
- The included double-sided tape and adhesive cannot provide sufficient bonding strength on the following wall surfaces or materials.
Please check your wall surface prior to installation:
Textured, rough, or curved wall surfaces
Easily damageable surfaces (such as wallpaper) or surfaces with peeling paint
Hard-to-bond materials, including PVC (polyvinyl chloride), rubber, polypropylene, and polyethylene
Surfaces with fluorine or silicone coatings
Concrete or plaster/stucco walls
■ Package Contents
- Base Plate (Mounting base plate attached to the wall) × 1
- Sliding Plate × 1
- Vinyl Decals × 2
- Double-Sided Adhesive Tape × 1 set
- Adhesive × 1 tube
■ Installation Instructions
1. Apply the Vinyl Decal
*The surface on which to apply the vinyl decal varies depending on the installation orientation.

① Select your preferred font. Peel off 2–3 cm of the backing paper from the edge, align the decal, and slowly apply it starting from the edge.


② Press firmly using a plastic ruler or similar tool to prevent wrinkles and air bubbles.

③ Verify that the decal has adhered securely, then slowly and carefully peel away the transfer tape.


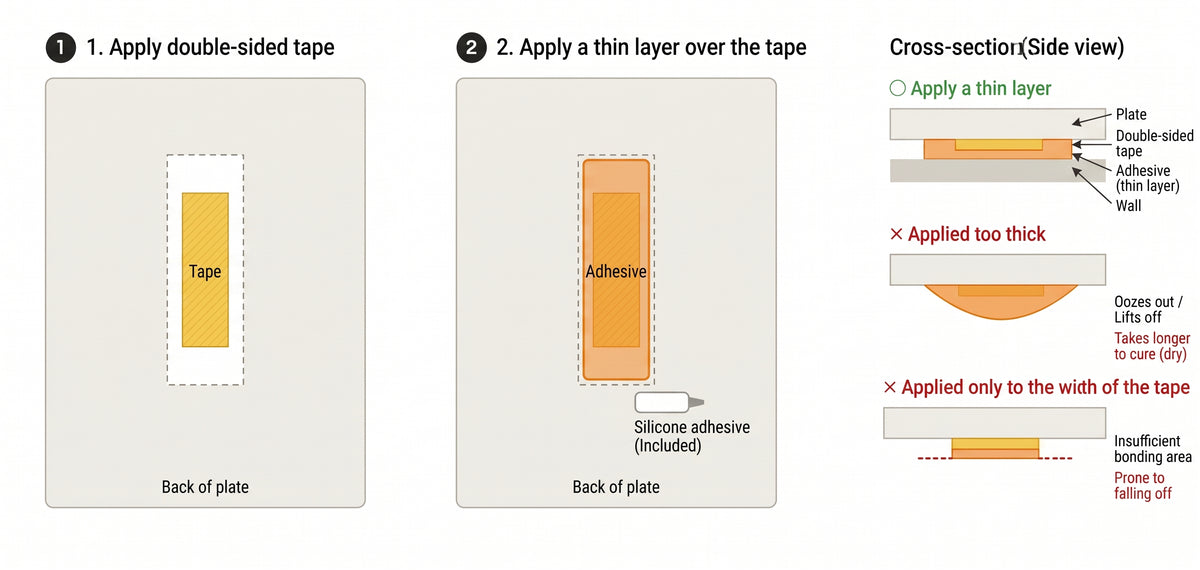
2. Apply Tape and Adhesive
① Apply double-sided tape strips to both ends on the back of the base plate (the side that contacts the wall).

② Spread a thin, wide layer of adhesive over the applied double-sided tape to cover it.
3. Clean Wall Surface and Mount Sign
① Clean the mounting surface to remove any oil, moisture, dirt, or dust.
② Peel off the release paper from the double-sided tape, place the base plate in your desired location,
and press firmly for approximately 30 seconds to bond.
③ Temporarily secure the plate with masking tape for approximately 24 hours, taking care not to overlap with printed areas.
④ After verifying that the adhesive has set securely, gently remove the temporary tape.
⑤ Slide the sliding plate into place to complete the installation.